MoneyBuckets Quick Start
By Joseph Delgado. Copyright 2011 by Enchanted Quill Press LLC
Quick Start
After you install MoneyBuckets and connect it to its database there's three things you need to do to get starting using it:
- Setup your Accounts.
- Enter your Balance Forward or First Deposit.
- All your accounts are reconciled and have a accurate current balance.
Sections in this Document
MoneyBuckets Main Menu
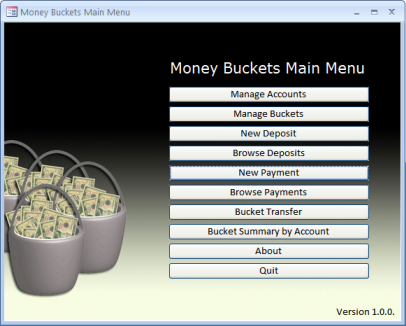 The main menu comes up first when starting MoneyBuckets. This Quick Start will get you familiar with Accounts, Buckets, Deposits, and Payments. Other menu items are for later tutorials.
Just keep in mind, every penny from a Deposit goes into a Bucket just as every penny from a payment comes from a Bucket.
Click on the "Manage Accounts" button from the Menu and continue reading below. [Top]
Setting up Accounts
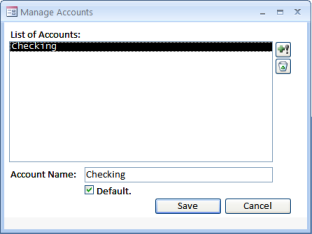
MoneyBuckets doesn't come with any accounts. So we can get started by clicking the +! icon to the right of the "List of Accounts" list box, entering the name of the account (Someplace Checking), and clicking Default or not, and then on Save. If you have more than one account repeat the process and click on Cancel or Close when finished.
All Deposits and Payments have to hit one account. Use one account or use one most frequently then you should click on "Default" which makes it come up first in all the forms.
If you make a mistake click on the account and then the recycle bin to delete. Done? Click on "New Deposit" from the menu to continue. [Top]
Enter your Balance Forward or First Deposit
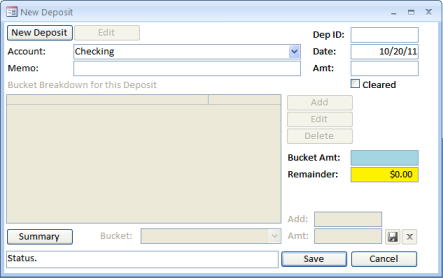
Now that we have one or more accounts setup. Naturally we want to put some money into it. MoneyBuckets comes with two Buckets: Emergency Fund and Overflow. Emergency Fund is money to cover unexpected emergencies instead of using debt. Overflow is the Bucket that catches all the money left over (hopefully) from all the other buckets. Imagine a big bucket under the other buckets, as they get full the spill over falls in the Overflow Bucket.
To get start quickly without setting up a Budget or other Buckets we're going to create a deposit for either our Balance Forward or our inital deposit into a new account. Naturally it's very important to reconcile your existing accounts before creating a deposit to avoid making adjustments later to one lump sum of money. Below is a quick break down of the fields on the Deposit form.
Dep ID: Normally use this for the Deposit Type. DD=Direct Deposit. TRA=Transfer. ADJ=Adjustment. BF=Balance Forward. If you want to record your paycheck's check number you can do that too. Date: Deposit Date. Amt: Amount of the Deposit. Cleared: if it shows up on your bank statement or online check the box.
Account: Select the account the deposit is going to affect. Memo: is just another field for recording. I use it for to distinguish between my paychecks, my wife's, and other money. Once all the data is entered click on "Save" to get the Deposit into the system and open the Buckets section. [Top]
Distributing your Deposit Into Buckets
 Once you hit Save the middle and bottom sections of the form are unlocked. Click on Add and you are taken to the bottom part of the form where you can select a Bucket from the drop down and enter the amount you'll be assigning to that bucket. If you don't have any other buckets can assign all of your deposit or balance forward to Overflow. If you have money set aside for an Emergency Fund then drop some money in there. Remember the Emergency Fund is for Emergencies so don't fund it too quickly if you need that money for something else.
If you need to make changes you can click on the Bucket list and modify the amount or in the Add: field you can add or subtract money without pulling out a calculator. Say you have $400 in that Bucket and need to take out $47.23. All you need to do is to type -47.23 in the Add: field and MoneyBuckets will handle the calc for you.
Once the entire deposit has been assigned to one or more Buckets click on "Finish" to close the form or enter another Deposit. [Top]
Payments
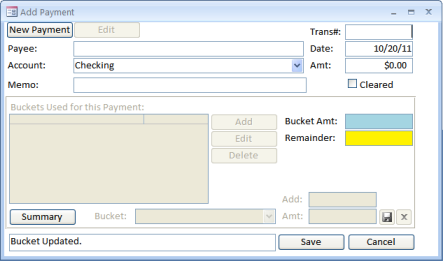 Depositing Money is great, but eventually we'll need to take some of it out. Now that expense can be for Investing or Savings it still leaves a Checking account just like a payment either through: a check, Money Order, Transfer, Electronic Funds Transfer, ATM, or a Debit Card Transaction. A Bucket's only purpose is to fill up and be poured out to cover an expense. Can think of Expenses as Fires, the Money in your Buckets helps put them out. Don't put out an expense and it often grows back with interest.
Some of the fields are the same from Deposits. We'll start off with the Trans#: which is often a check number, ATM (Automated Teller Machine), EFT (Electronic Funds Transfer), POS (Point of Sale or Debit Transactions), TRA (Transfer), etc. It's a short free form field. Date of the Payment and the Amt or amount. If the payment cleared your Bank then you can check the box. Payee should match whatever is written on the check or the location of where the transaction took place. If I entered an ATM transaction then I enter the bank name and street address. If it's a POS transaction then I enter the Store Name and Location. Account is where the Money is coming out of and Memo is free space to record what it was for, any relevant account info, or why you purchased something, etc. Just like Deposits once you hit Save other parts of the form open up.
Every penny of the Payment has to come from one or more Buckets. If you are starting quickly then everything has to come out of Overflow or your Emergency Fund. Budgeting takes time and if you need to dip into the Emergency Fund to cover your expenses that's fine. Just make sure you fill it back up as soon as possible. Thinking something bad is not going to happen is often a sure fire way to make sure it does.
Once every penny has been distributed click on "Finish" to complete the transaction. MoneyBuckets will ask you if you want to enter another and if you click No it will close form. [Top]
Summary
I think MoneyBuckets is a pretty easy system. I've been budgeting my money this way for a long time and when I stopped my debt got out of control, so I know the system works and to develop MoneyBuckets makes the budget system work a lot easier.
Money comes in as Deposits and is poured into Buckets. As expenses come in those buckets are poured into Payments and leave the account. Budgeting this way can be a little weird at first so use Overflow until your comfortable with how things work. Can start with a monthly expense like rent or your mortgage. Say your rent is $1,000 and you get paid $500 weekly starting on October 7th, 2011 you can setup your Deposits like this.
| Deposits of $500 Weekly |
| Date | Bucket | Amount |
| 10/7/11 | Rent | $250.00 |
| | Overflow | $250.00 |
| |
Total: |
$500.00 |
| 10/14/11 | Rent | $250.00 |
| | Overflow | $250.00 |
| |
Total: |
$500.00 |
| 10/21/11 | Rent | $250.00 |
| | Overflow | $250.00 |
| |
Total: |
$500.00 |
| 10/28/11 | Rent | $250.00 |
| | Overflow | $250.00 |
| |
Total: |
$500.00 |
By the time your rent is due on 10/31/11. Your Rent Bucket will have $1,000 in it. A couple of times per year there's an extra Friday in some months. If you budget this way you freed up $250.00. If you budget all of your expenses into a bucket then more of this money is freed up for paying off debt, saving, investing, or vacation.
The ultimate idea behind MoneyBuckets and Budgeting this way is to level all of your expenses, make it routine and predicitable, and give you a road map to hit your goals. With the rent example, if I get paid weekly then I will have rent ready if I set aside $250 a paycheck. Anyway I hope you download the application and review the Excel spreadsheet and try this method of budgeting to see how it can help you.
If you have any questions please let us know [email protected] or on Twitter. I appreciate your time reading this article. [Top]


 The main menu comes up first when starting MoneyBuckets. This Quick Start will get you familiar with Accounts, Buckets, Deposits, and Payments. Other menu items are for later tutorials.

 Once you hit Save the middle and bottom sections of the form are unlocked. Click on Add and you are taken to the bottom part of the form where you can select a Bucket from the drop down and enter the amount you'll be assigning to that bucket. If you don't have any other buckets can assign all of your deposit or balance forward to Overflow. If you have money set aside for an Emergency Fund then drop some money in there. Remember the Emergency Fund is for Emergencies so don't fund it too quickly if you need that money for something else.
 Depositing Money is great, but eventually we'll need to take some of it out. Now that expense can be for Investing or Savings it still leaves a Checking account just like a payment either through: a check, Money Order, Transfer, Electronic Funds Transfer, ATM, or a Debit Card Transaction. A Bucket's only purpose is to fill up and be poured out to cover an expense. Can think of Expenses as Fires, the Money in your Buckets helps put them out. Don't put out an expense and it often grows back with interest.